Setting up a CI/CD pipeline is critical for scaling your development and release process to match rapid growth in team size and maturity.
Many Android devs will at some point in their careers be responsible for building and uploading an APK or AAB to the Google Play Console. For many indie devs and small teams, using Android Studio or Gradle for this gets the job done without too much of a fuss. But as team size grows and the need for more frequent and predictable releases arises, many teams realize that building APKs/AABs off an individual’s machine just doesn’t scale. At this point, teams will begin to explore what CI/CD options are out there, recognizing that establishing a robust CI/CD pipeline will improve the consistency, reliability, and quality of their development and release process.
We know that creating a build & deploy CI/CD workflow for the first time can feel daunting, which is why (having done this many times before) we’re here to help! With step-by-step tutorials and clear instructions, we hope to make your team’s transition to a smooth CI/CD pipeline seamless and pain-free. We’ll also cover one way you can actually autogenerate a complete build & deploy pipeline built on GitHub Actions and fastlane, using a free tool we made.
Why GitHub Actions?
GitHub Actions has grown into one of the most popular CI/CD provider choices ever since GitHub launched the Actions product in 2018. One of the biggest benefits of going with GitHub Actions over other providers is its native experience and direct integration within GitHub itself, if your team already uses GitHub for source control. It’s a huge productivity boost to have your CI/CD interface sit right alongside the version control tool you’re already using. Beyond that, GitHub Marketplace is a great source of community-built Actions that makes putting together your workflows even simpler.
In this tutorial, we’ll spin up a complete build & upload pipeline for Android in just 30 minutes using fastlane and GitHub Actions.
Let’s get started!
Steps
- Install fastlane and set up your Fastfile
- Configure your secrets in GitHub’s encrypted secrets
- Set up a basic GitHub Actions workflow .yml file
- Run your build!


Install fastlane and set up your Fastfile
fastlane is a Ruby library created to automate common mobile development tasks. Using fastlane, you can configure custom “lanes” which bundle a series of “actions” that perform tasks that you’d normally perform using Xcode or xcodebuild. You can do a lot with fastlane, but for the purposes of this tutorial, we’ll be using only a handful of core actions.
Install fastlane using one of the recommended installation methods. Here we’ll use Bundler, running <code>brew install fastlane<code> from our main app project directory.
Then, we’ll run <code>fastlane init<code> and enter your package name when prompted. You can skip past any other prompts.
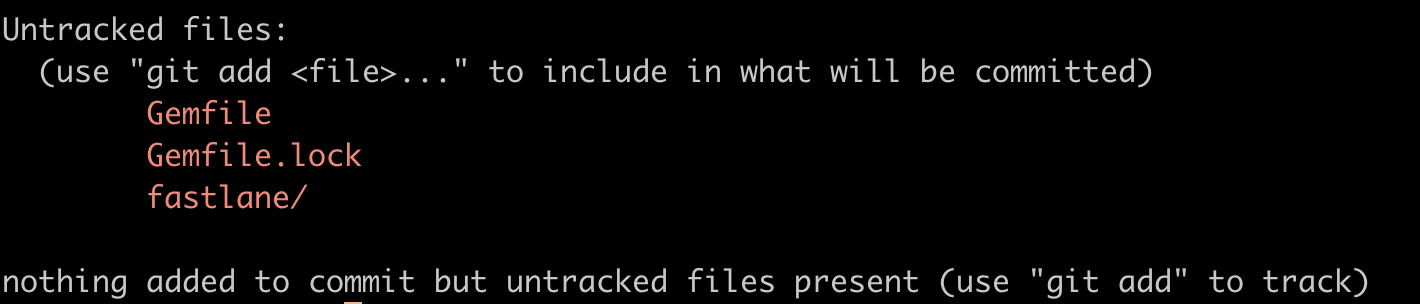
You’ll end up with a fastlane directory, which contains a Fastfile, and an Appfile. You’ll also find a Gemfile and Gemfile.lock, if they didn’t already exist in your project.
Next, we’ll install a plugin that we’ll use to automate version code increments. Plugins are actions that have been open sourced by the community and can be used to enhance fastlane’s existing actions. Run the following command from your app’s root directory:
This will install the <code>fastlane-plugin-increment_version_code<code> plugin that we’ll use in a custom lane from our Fasfile. It will also create a Pluginfile file in your fastlane directory that you can use to manage any plugins you add later. And finally, it will update your Gemfile to properly reference the Pluginfile – to double check that your Gemfile was properly updated, open it up and make sure it looks something like this:
Now that we’ve got everything installed, let’s open up our `Fastfile` and take a look at what actions have already been added to it by default.
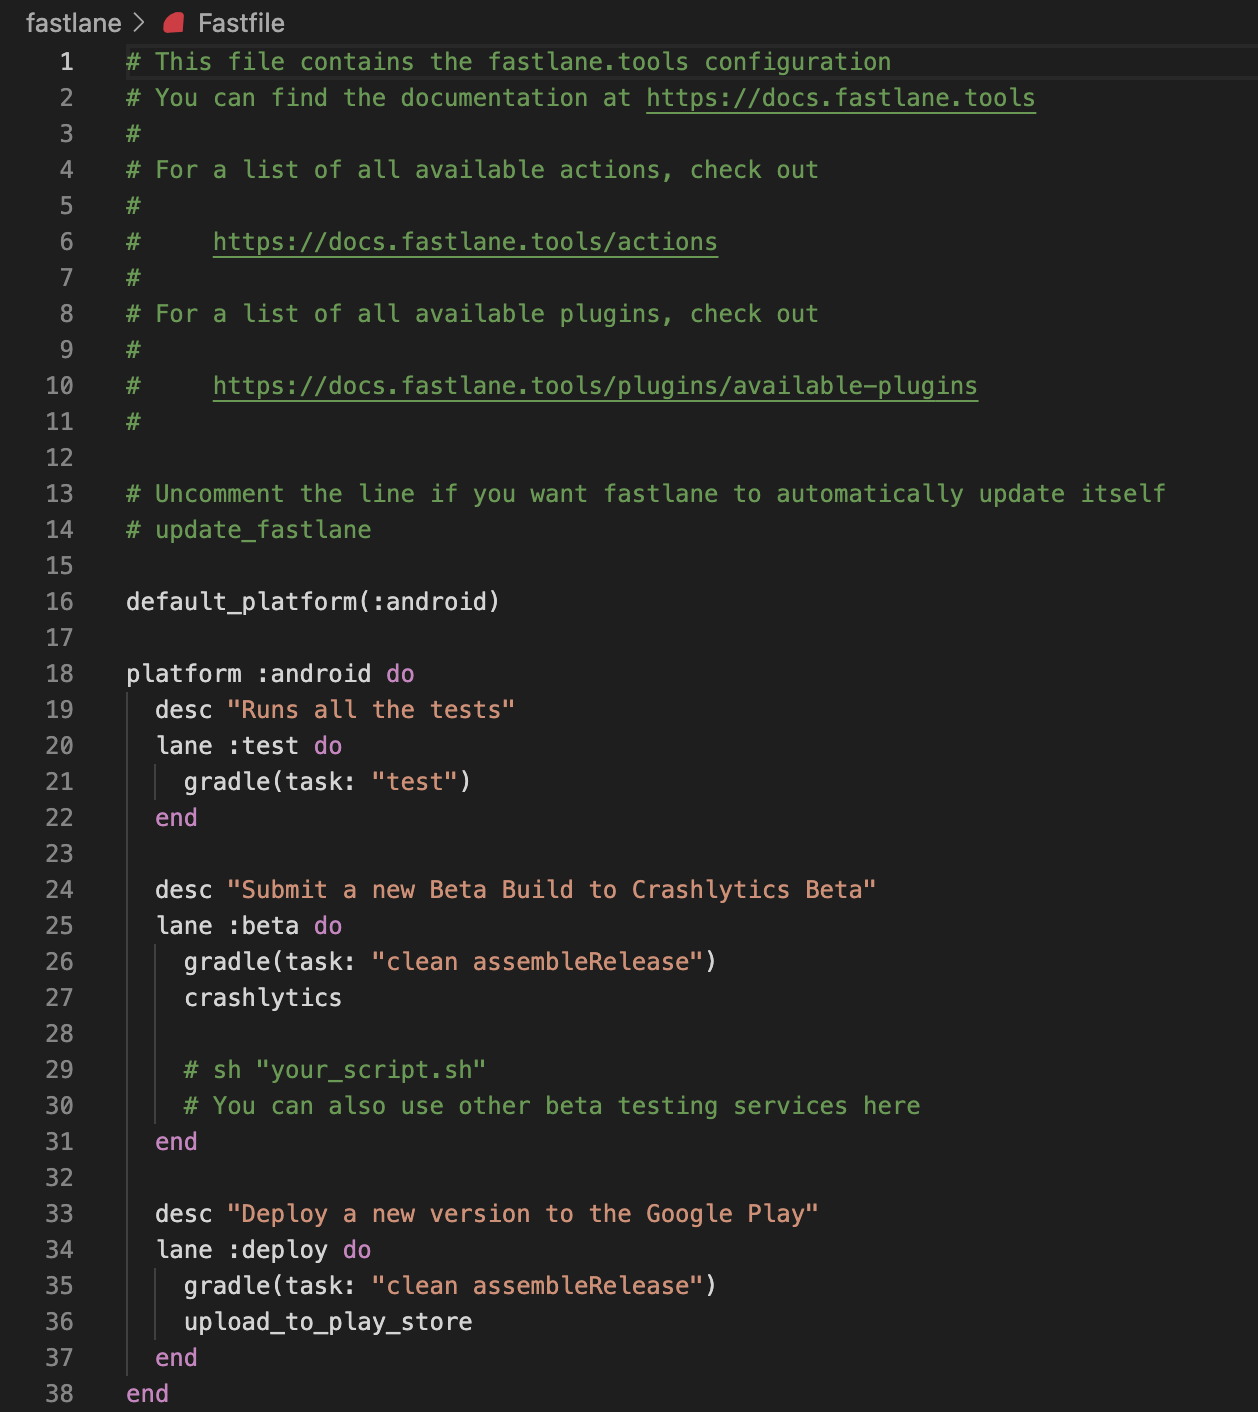
Out of the box, the Fastfile created for us by the <code>fastlane init<code> command includes three lanes: test, beta, and deploy.
You’ll notice that all three lanes make use of the <code>gradle<code> action (but each one passes in different arguments for the <code>task<code> parameter). We can use the <code>gradle<code> action to build and test, and even sign our Android app.
Modify your Fastfile by deleting the <code>beta<code> lane (we won’t be uploading to Firebase in this tutorial), and then modifying the <code>deploy<code> lane as shown:
The extra parameters now passed to the <code>gradle<code> action will allow us to build a signed release <code>.aab<code>, while the <code>upload_to_play_store<code> action will use an Android service account key to authenticate with the Google Play Developer API and upload our signed build to the Play Console’s <code>internal<code> track, where it will be immediately available to all internal testing users. We also added a new <code> fetch_and_increment_build_number<code> action that will be called before the build and upload steps – this is a custom lane that will fetch the latest version code from the Play Console and – using the plugin action we added earlier – increment the version code locally. Add the custom lane to your Fastfile as follows:
You’ll notice we’re passing in all but a few arguments as environment variables. We’ll set these up as GitHub encrypted secrets next.
Storing your secrets in GitHub encrypted secrets
In order to authenticate with the Google Play Developer API, we’ll need a service account key. The service account key file is considered sensitive, which means we’ll need to store it securely, but in a place where it can be accessed by our GitHub Actions workflows and our Fastfile when needed. Enter GitHub’s encrypted secrets: we’ll be storing all our sensitive keys in repository secrets, holding them securely while also making them automatically accessible to the GitHub Actions workflows in the repository.
Creating & storing your Google Play service account key
If you need to create a new service account key, follow the steps outlined here. One you have your service account key JSON file, let’s add it to your GitHub repository’s encrypted secrets.
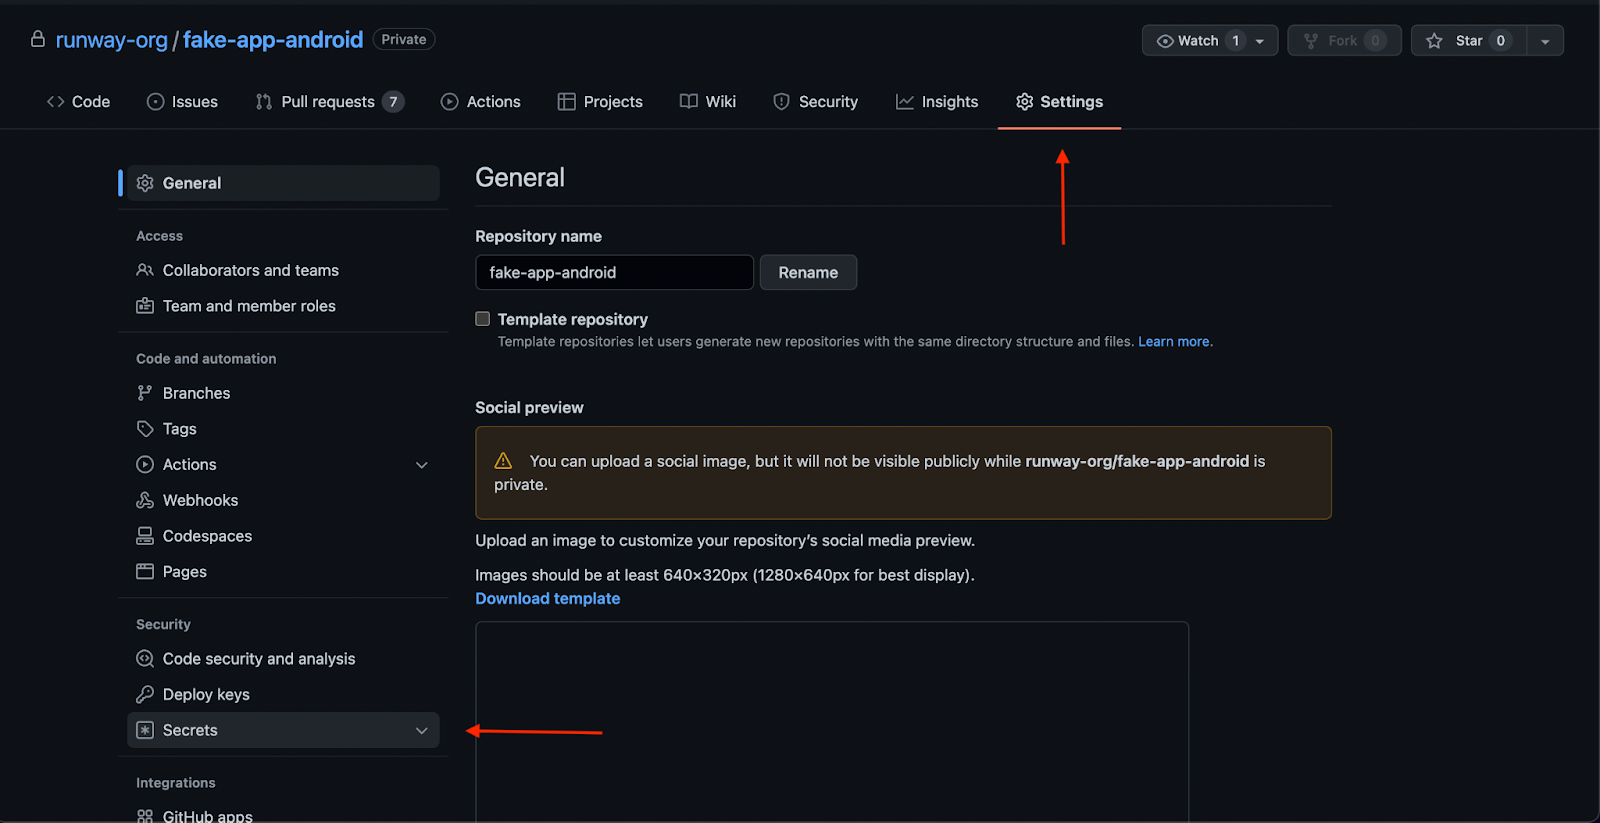
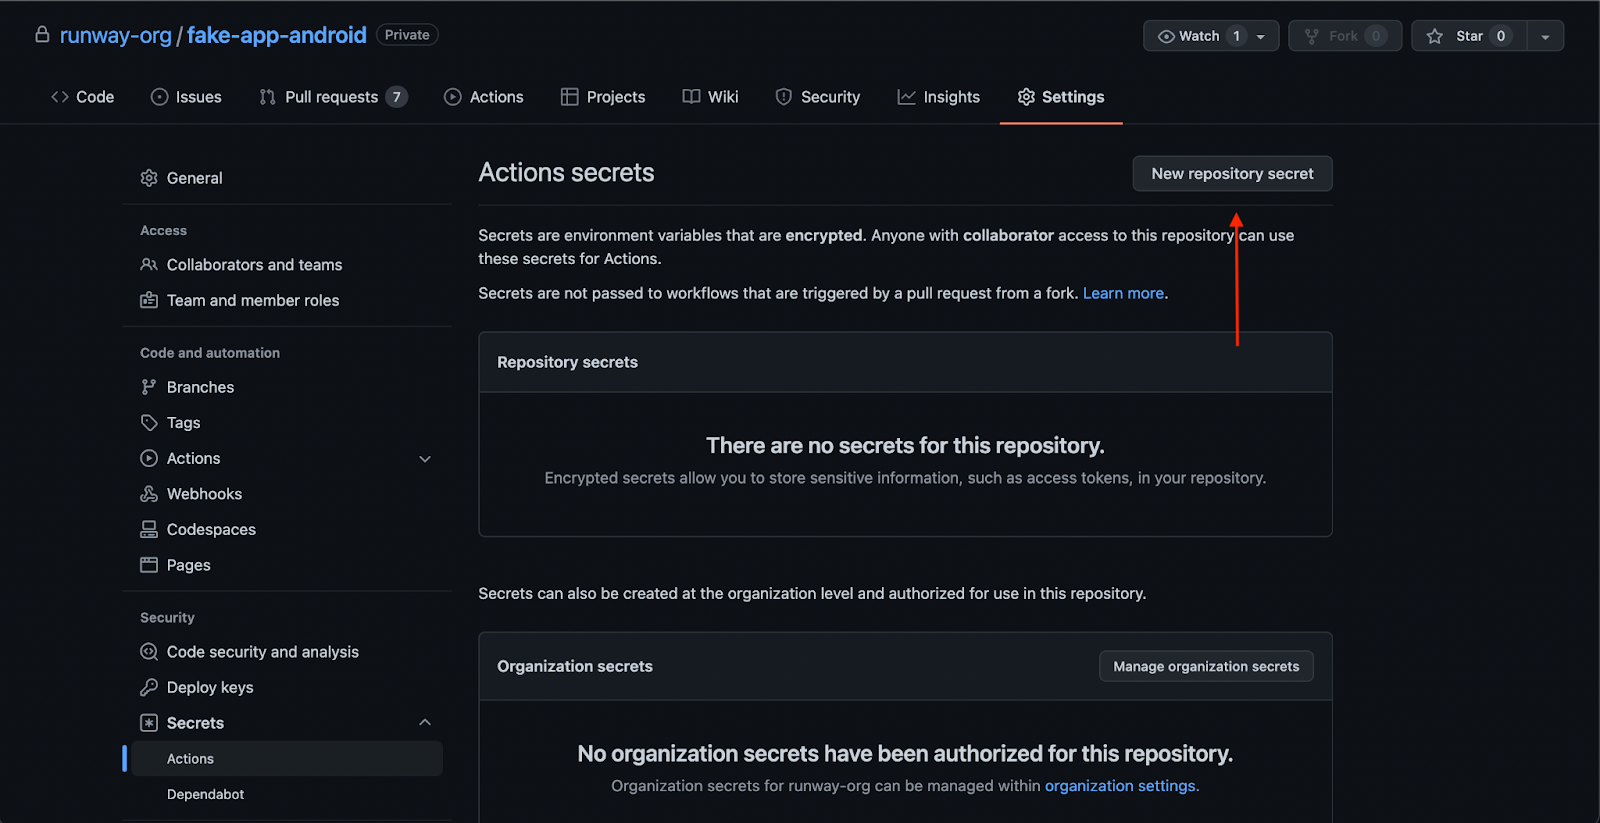
To add a new secret to GitHub’s encrypted secrets, first navigate to the Android repo to which you’ll be adding the GitHub Actions workflow. On the far right, click “Settings”.

Then, click “Secrets”, then “Actions” from the list in the left menu.
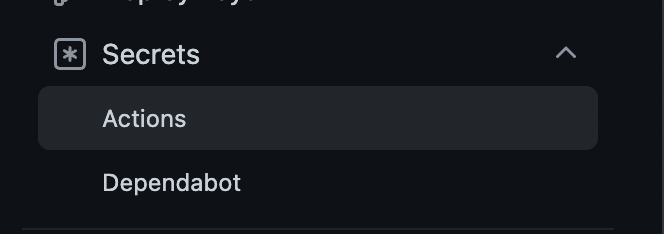
These are the encrypted secret environment variables for the repository. Any workflows set up on the repository will have access to these repository secrets.
From here, click “New repository secret” to add a new secret:
When you click “New repository secret”, you’ll see a form that will prompt you to enter a name for your new secret, and its value.
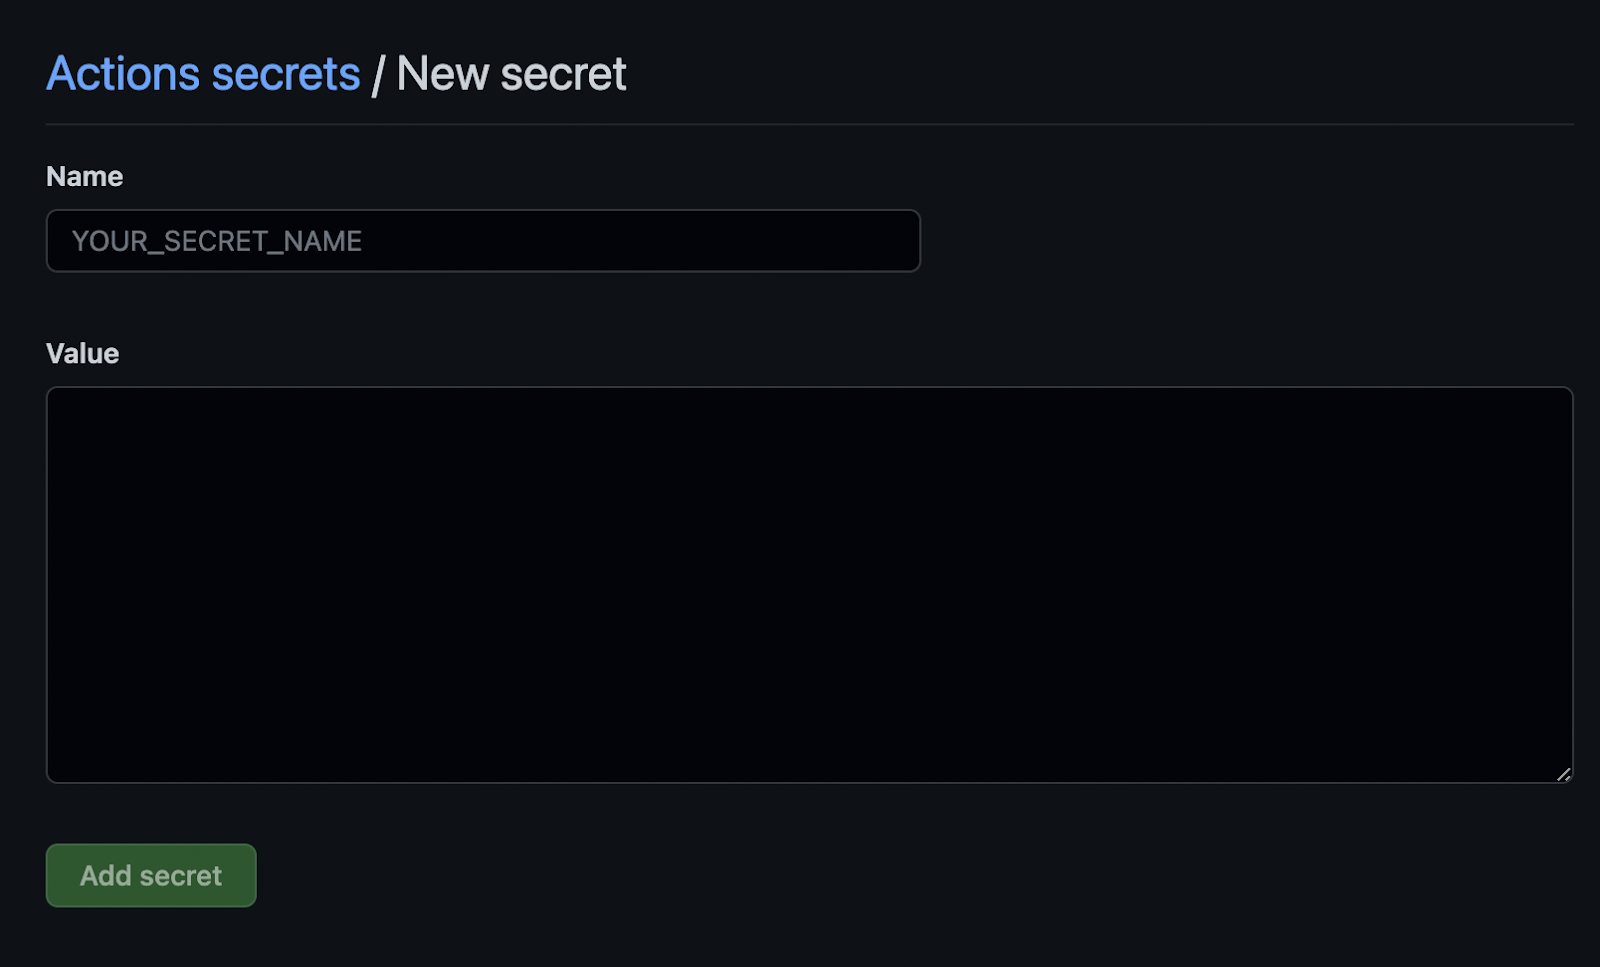
GitHub secrets only accept string values, so for certain credentials (any <code>.jks<code> or <code>.json<code> files for example), you’ll first need to convert the file to a base64-encoded string before adding it to GitHub secrets. You can do this from the command line:
This copies the resulting string to your clipboard, so you can paste it directly into a new repository secret on GitHub.
For example:
Let's create a new repository secret as follows:
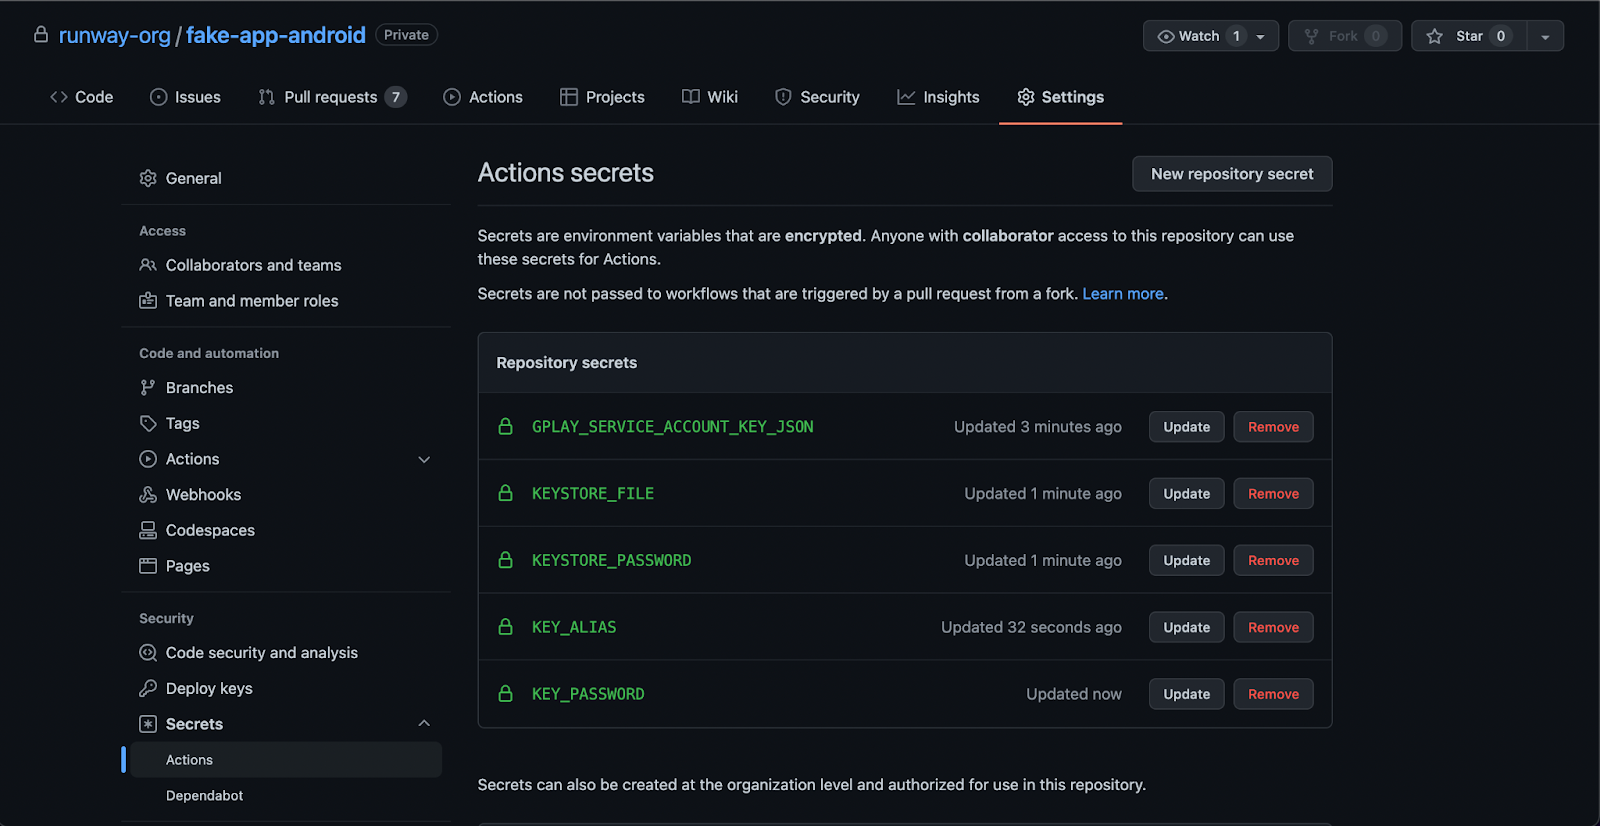
- GPLAY_SERVICE_ACCOUNT_KEY_JSON: the base64-encoded service account key JSON
Please note that you should store a backup copy of your secrets securely in another location (somewhere that is not GitHub encrypted secrets), as you won’t be able to export or access the credentials again from GitHub after you’ve added them.
With our service account key added to GitHub’s repository secrets, we can now authenticate with the Google Play Developer API from within any GitHub Actions workflows added to the repository.

Storing your Android signing key
In order to properly sign Android release builds in CI, the workflow will need access to either an Android upload key or an app signing key. Apps created after August 2021 will use Google’s new Play App Signing system by default, in which a user-managed upload key is used to sign AABs prior to upload, but the app signing key is managed by Google. If your team is making use of Google’s Play App Signing, then all you’ll need for the CI pipeline is your app’s upload key, since signing is deferred until after the AAB has been uploaded to the Play Console. If you still need to create an upload key and keystore, follow the instructions found in the Android developer documentation.
If your team hasn’t yet migrated to Google’s Play App Signing system, then you’ll instead need to make your app signing key available to the CI workflow in order to properly sign your app prior to upload.
Add the following as repository secrets:
- KEYSTORE_FILE: the base64-encoded .jks or .keystore file used to sign your Android builds. This will either be the keystore file associated with your upload key (if using Play App Signing), or your app signing key.
- KEYSTORE_PASSWORD: the password associated with the keystore file
- KEY_ALIAS: the key store alias
- KEY_PASSWORD: the private key password
With these secrets added to GitHub’s repository secrets, we’re ready to set up our GitHub Actions workflow to run our builds.
Set up your GitHub Actions workflow .yml file
Now, let’s set up our Android GitHub Actions workflow .yml file – it’ll define the steps we’ll run as part of our workflow. Within these steps, we’ll call our fastlane lanes.
First, let’s create the necessary folders. From your project’s root directory call:
Then, paste the following code into your newly created <code>build-upload-android.yml<code> file:
Let’s break down what this workflow is doing.
The workflow trigger
This line defines the trigger for the workflow as a manual workflow trigger (i.e., you start the workflow with a button click in the GitHub Actions UI). GitHub Actions workflows support a number of triggers; for example, if you want the workflow to run any time a specific branch has code pushed up to it, you would define it like so:
The “deploy” job
Our workflow defines a single job, called “deploy”, which runs on the latest Ubuntu machine version supported by GitHub Actions workflows.
The job has a series of steps, marked with a dash “-”. Some of these steps will use predefined “actions”, which can either be provided by GitHub (e.g. <code>actions/checkout@v2<code>), or available as open source actions created and supported by the community through the GitHub Marketplace.
Step: Checking out the repository and setting up the Ruby environment
The first step is checking out the codebase using GitHub’s <code>checkout<code> action. Then, we install our dependencies. Since we’re using fastlane, which is a Ruby gem, we’ll define a Ruby environment with the option <code>bundler-cache: true<code>, which will automatically run <code>bundle install<code> and cache installed gems. <code>bundle install<code> will install fastlane and any other Ruby dependencies in your project.
Step: run tests
Then, we’ll run our fastlane <code>test<code> lane, to run our tests before the deploy happens.
Step: decode service account key JSON file
Next, we’ll need to decode the service account key we stored in GitHub’s repository secrets so that it can be used by our fastlane deploy lane. We’ll do this using an open source GitHub action called base64-to-file, passing in our base64-encoded service account key JSON which is stored in GitHub’s repository secrets. We’ll also specify the file name we want the action to use when decoding the service account key.
The action outputs a <code>filePath<code> variable that can be combined with the step’s <code>id<code> to access the resulting service account key JSON file, like this:
We’ll pass in our service account key using the step’s output in a later step.
Step: decode the Keystore file
We’ll use the same <code>base64-to-file<code> action to decode our Android key store file, which we’ll pass into our fastlane <code>deploy<code> lane to build and sign a release bundle of our Android app. We’ll use the output filePath in a later step.
Step: build & deploy Android AAB
With all the required repository secrets decoded, and the version code updated, we’re finally ready to call our <code>deploy<code> fastlane lane to build, sign, and upload our Android app to the Google Play Console’s internal track. We’ll define environment variables for the step, passing in the output of the <code>android_keystore<code> step, the <code>service_account_json_file<code> step, and the rest of the repository secrets that we added earlier:
Step: upload build artifacts
The last step in the workflow uploads the produced artifacts (everything in the release folder) so they can be viewed in GitHub as part of the workflow. By default, GitHub will store build logs and artifacts for 90 days, but this retention period is customizable. If you don’t have any use for the build’s artifacts, you can remove this step from the workflow.
Running your build
Now, you can commit and push up your newly created GitHub workflow file. It’ll show up in your repo under the “Actions” tab.
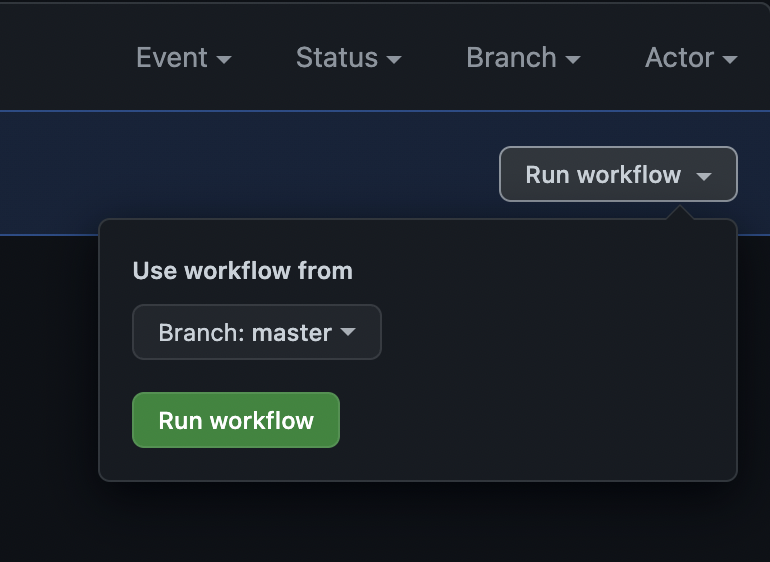
Once you’ve pushed up your GitHub workflow file, you’ll be able to trigger your workflow directly from GitHub’s UI. Simply find your workflow in the “Actions” tab, and click “Run workflow”:
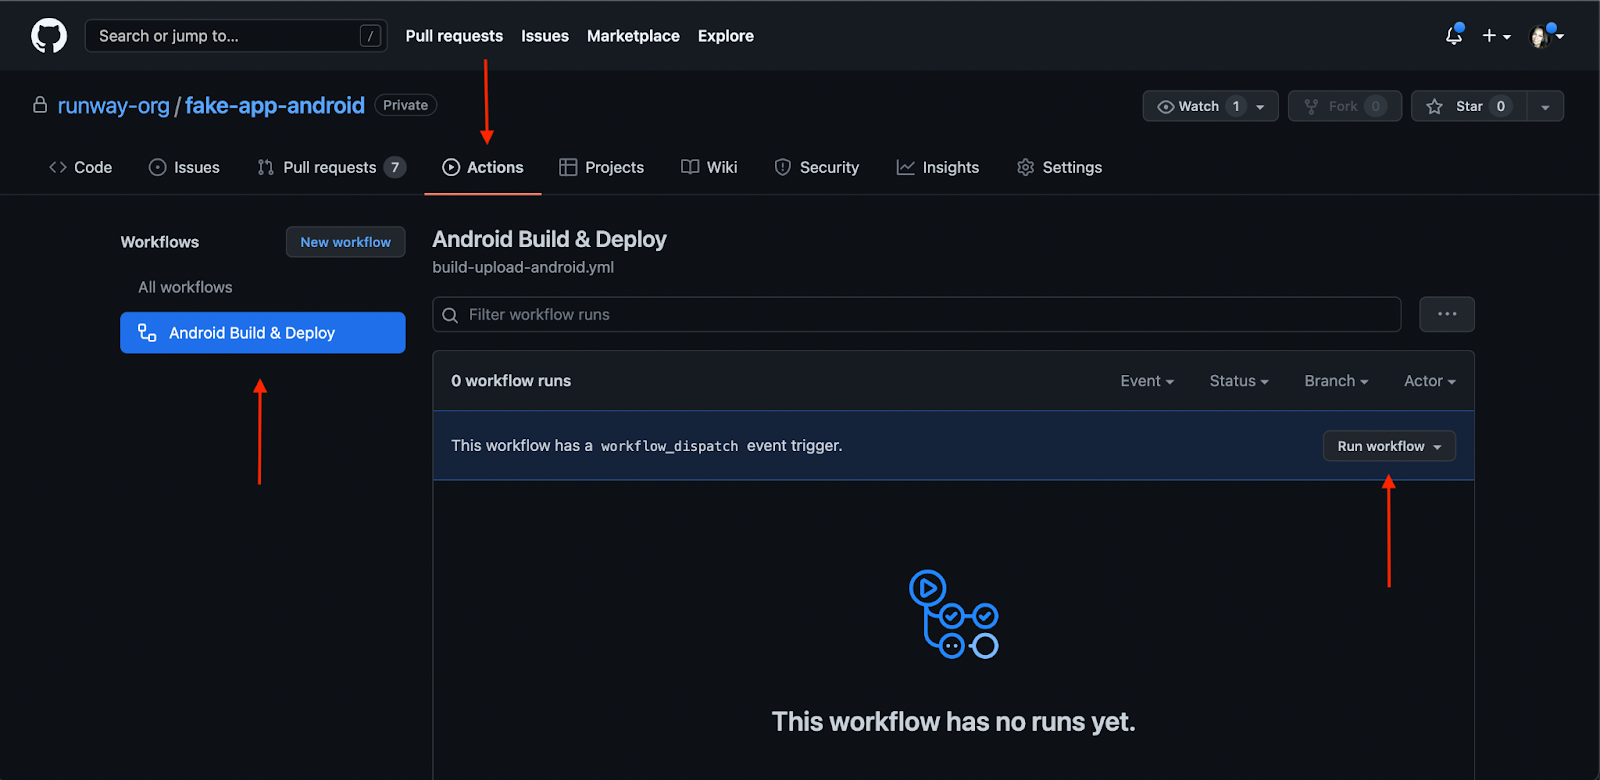
Choose a base branch to run the workflow from, and click “Run workflow” to try out your workflow!
And that’s it!
Using fastlane and GitHub Actions, we’ve put together a basic (but complete!) CI/CD pipeline that increments version code numbers, creates a signed release <code>.aab<code> build, and uploads the build to the Play Console’s internal track. Anyone that has access to your GitHub repository can now trigger the workflow directly from GitHub, or you can set a workflow trigger to automatically kick off a workflow run any time commits are pushed to certain branches you specify.
With this build & deploy pipeline now in place, anyone on your team is empowered to create and upload builds, removing a common bottleneck while also increasing reliability and consistency in your dev and release process.
How to generate an iOS CI/CD pipeline automatically
If you’re interested in skipping past all those steps above, you can autogenerate an end-to-end build-and-deploy workflow using our Quickstart CI/CD wizard. The wizard will pull together all the necessary steps, configs, and secrets for you, then generate all the necessary files (GitHub Actions YAML, fastlane Fastfile, Ruby Gemfile, etc.) for you to merge straight into your repo or take with you wherever you like.
Questions or issues? Get in touch!


