Setting up a CI/CD workflow is critical for scaling your development and release process to match rapid growth in team size and maturity.
Many Android devs will at some point in their careers be responsible for building and uploading an APK or AAB to the Google Play Console. For many indie devs and small teams, using Android Studio or Gradle for this gets the job done without too much of a fuss. But as team size grows and the need for more frequent and predictable releases arises, many teams realize that building APKs/AABs off an individual’s machine just doesn’t scale. At this point, teams will begin to explore what CI/CD options are out there, recognizing that establishing a robust CI/CD workflow will improve the consistency, reliability, and quality of their development and release process.
We know that creating a build & deploy CI/CD workflow for the first time can feel daunting, which is why (having done this many times before) we’re here to help! With step-by-step tutorials and clear instructions, we hope to make your team’s transition to a smooth CI/CD workflow seamless and pain-free.


A quick intro on Bitrise
Bitrise is one of a few CI/CD providers that caters specifically to mobile app builds. It’s also unique in that it provides a user-friendly interface for configuring your workflows — a refreshing alternative to the ubiquitous (but often unwieldy and esoteric!) <code>.yml<code> file. Because of this, Bitrise can be an appealing choice for mobile developers looking to set up a standard CI/CD pipeline quickly and easily — in fact, you can create a complete build & deploy workflow on Bitrise without needing to write any code at all!
Hey — what about fastlane?
Many teams will turn to a tool like fastlane which, among other benefits, makes it possible to track changes to your build workflows and their unique configurations over time, through version control. fastlane also allows you to more easily migrate your workflows to another CI/CD provider if needed. But setting up and maintaining a fastlane Fastfile is a time investment, especially as your team and needs grow. Although Bitrise does have solid support for fastlane (via a fastlane Bitrise step), having it in place is not strictly necessary for setting up a complete (if basic) build & upload pipeline on Bitrise. So, if you’re short on time and motivation, Bitrise can be an attractive option.
In this tutorial, we’ll show you how to set up a build & deploy workflow for Android from scratch using the mobile-first CI/CD provider Bitrise. By leveraging their UI, we can easily get things up and running in as little as 30 minutes.
Let’s get started!
Steps
- Create a Bitrise account & add a new app
- Configure your workflow
- Configure workflow triggers
- Kick off a build
Create a Bitrise account & add a new app
First, create an account on bitrise.io - once your account is created, you’ll see a prompt to add a new app:
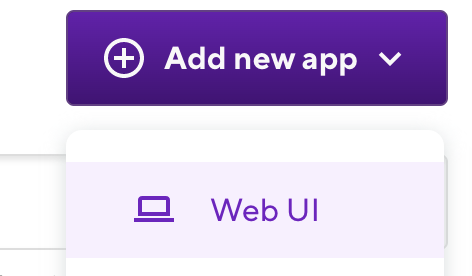
Bitrise will give you the option to set up your new app through their web app UI, or using their CLI. We’ll choose the web UI.
You’ll be taken through an app configuration flow that will hook up your new Bitrise app with your app’s version control repository. Bitrise will also automatically scan your codebase to detect your project’s build configuration. At the end of the configuration flow, you’ll have the option to register a webhook for your repo so that Bitrise can start a new build any time you push to the main branch you configure.
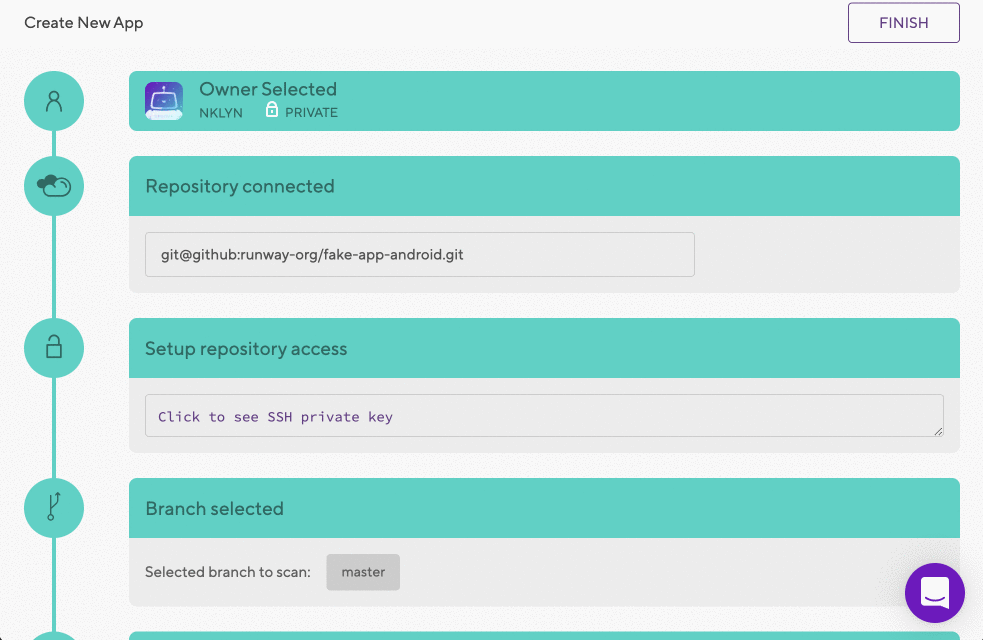
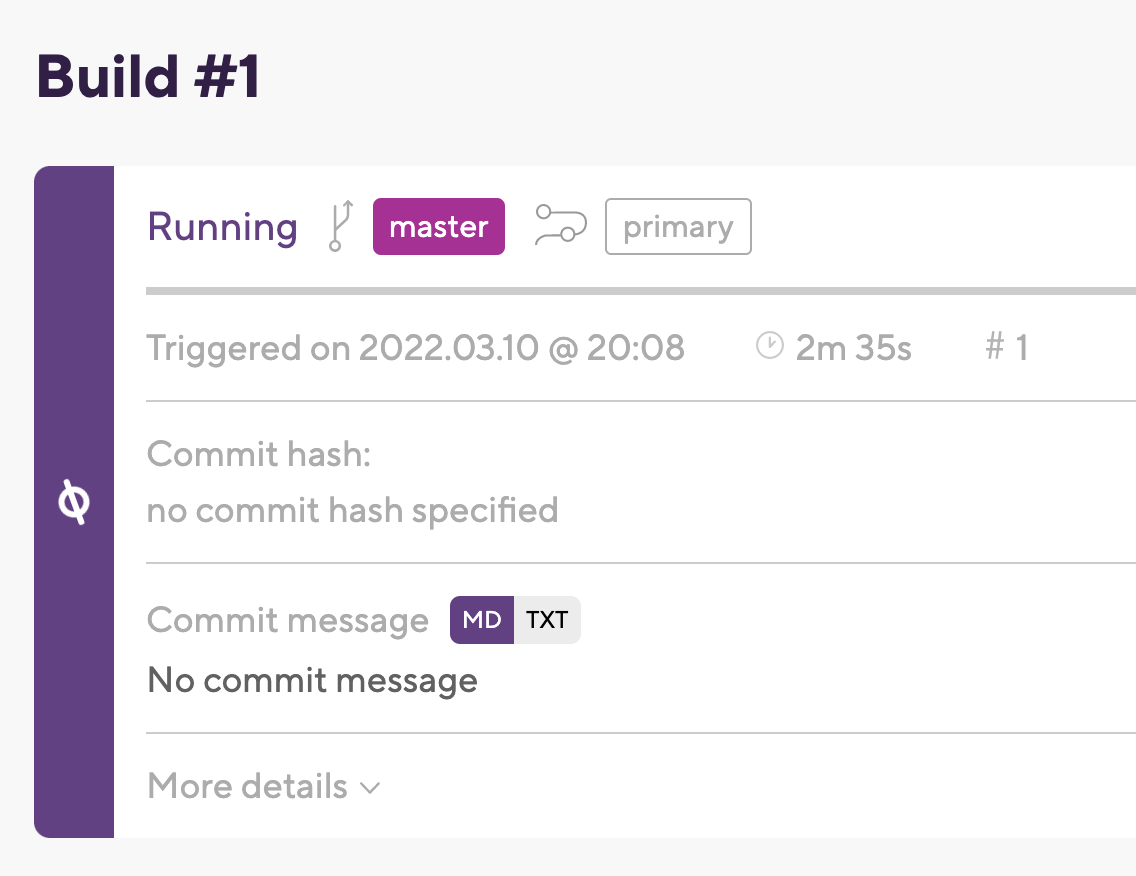
Bitrise will automatically create a starter workflow (called primary) and kick off your first build once you’ve finished the new app configuration flow.
Here’s what the primary workflow does out of the box:
- It clones your repo and checks out the main branch you defined as part of the app’s configuration flow
- It installs any missing Android SDK components
- It builds your app and runs any tests
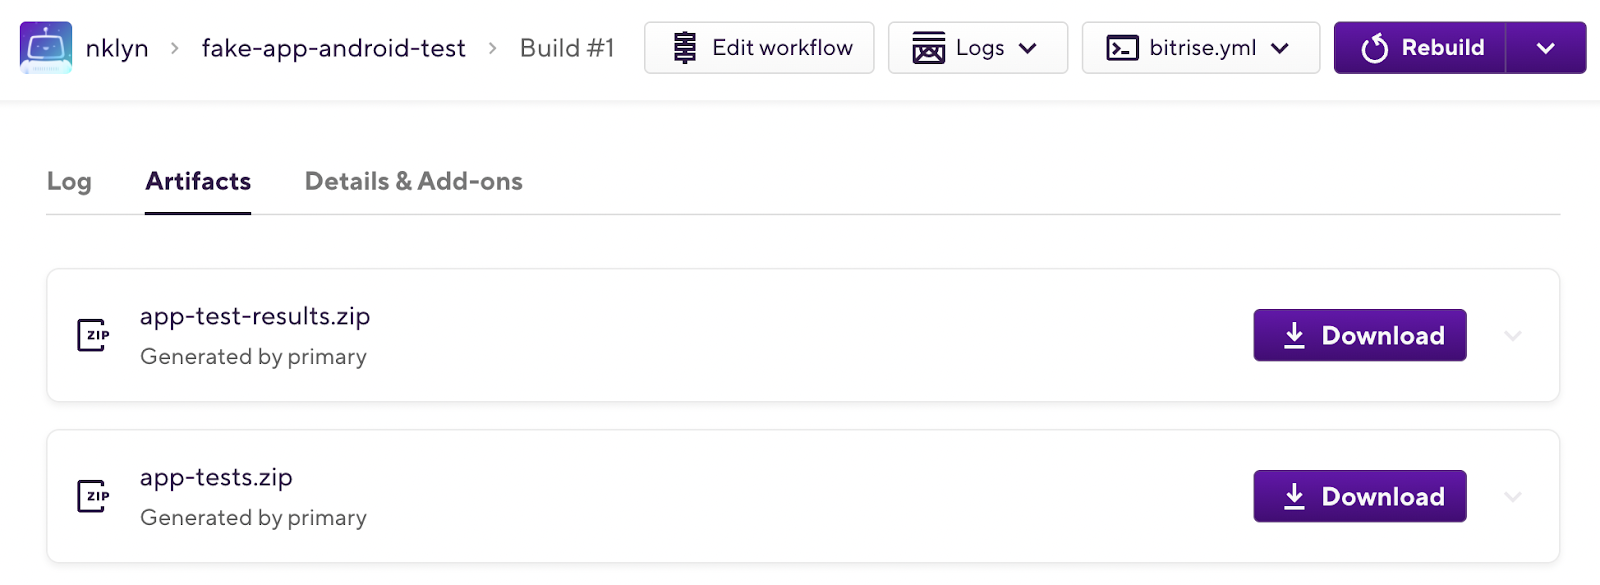
- It uploads any files resulting from the workflow run to Artifacts, where you can view and download them
For a basic CI workflow, that’s pretty good! But in order to build our app for Play Store distribution, and to upload AABs to the Play Console, we’ll need a workflow that does a bit more.
Configure the deploy workflow
Having a workflow that verifies that your app builds and your tests pass is a good thing to have set up on a development branch, but when you’re ready to distribute your app via the Play Store, you’ll want a workflow that does a bit more than that. Alongside the primary workflow that Bitrise created as part of the app configuration flow, you’ll also see a workflow called deploy. Besides the basic set up and tear down steps also found in the primary workflow, you’ll notice a few more steps in the workflow. Later on, we’ll explore the new steps found in this workflow, and add a couple more, but first, we’ll get everything in the “Code Signing” and “Env Vars” tabs set up so everything in our deploy workflow will be ready to go.
Configure Code Signing and add a Google Play Console API Service Account Key
Before we start adding steps to our deploy workflow, we’ll need to configure code signing and add a Google Play service account key to the workflow. Code signing will allow us to sign release builds within our Bitrise workflow, and adding a service account key will enable Bitrise to use the official Google Play Developer API to upload builds to the Google Play Console.
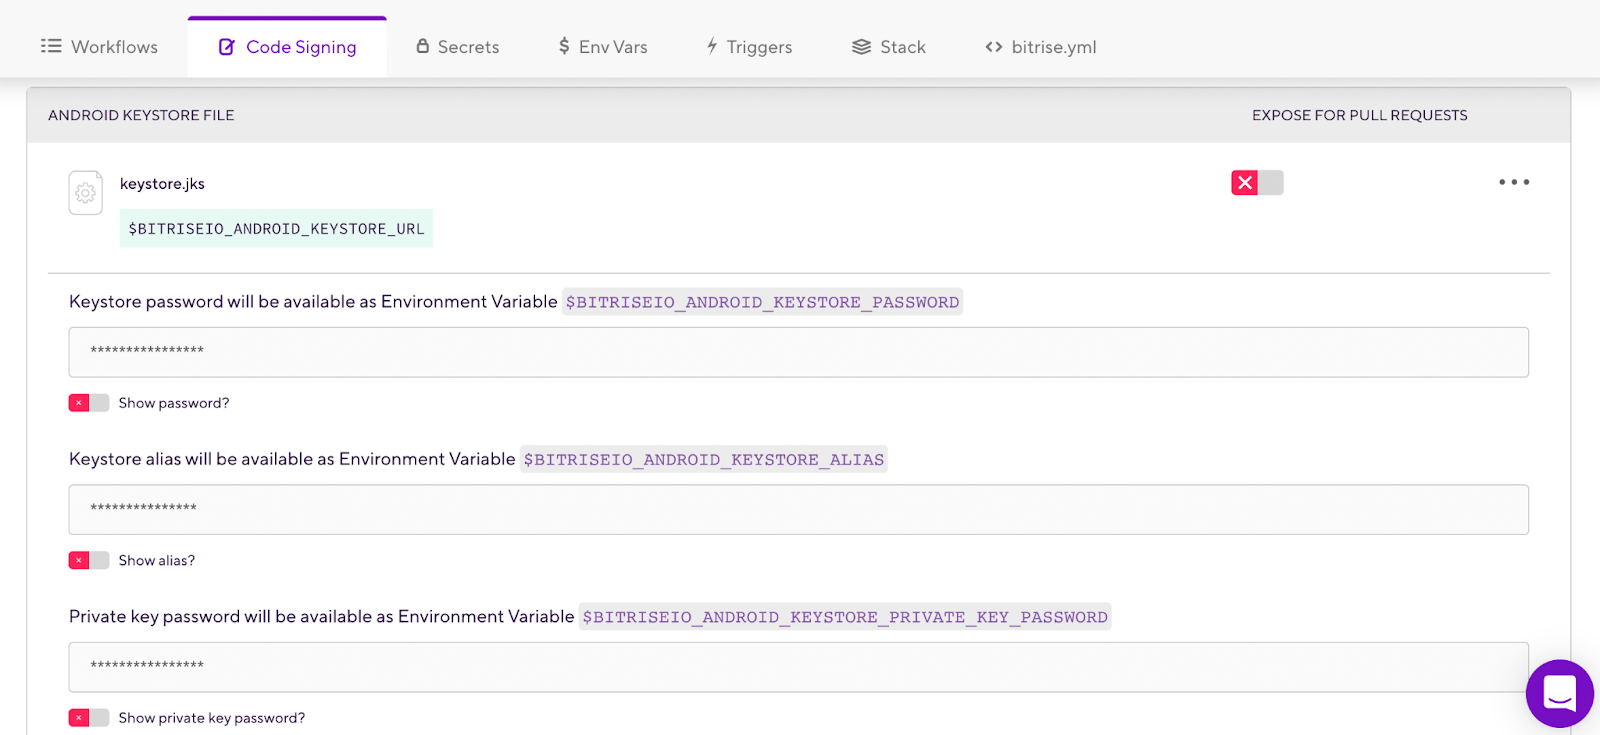
Switch to the “Code Signing” tab, and add your Android key store file (.jks), including your keystore password, alias, and private key password. You can choose to mark your Android keystore file as “protected”, meaning the file and its details cannot be viewed, copied, or downloaded once saved. Note that any environment variables you add to Bitrise can be marked “protected”, just make sure you have a backup copy of the variable’s value, since you won’t be able to retrieve it in the future from Bitrise.
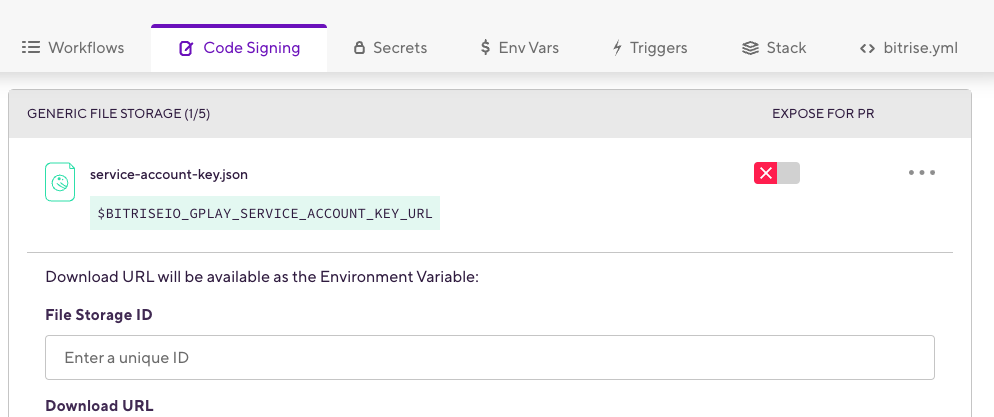
Next, we’ll add a service account key JSON file, to authenticate our deploy workflow against the Google Play Developer API. If you need to create a new Google service account key, follow the steps outlined here. Once you have the service account key JSON (.json), add it under the “Generic File Storage” section in the “Code Signing” workflow tab, and set the File Storage ID field to <code>GPLAY_SERVICE_ACCOUNT_KEY<code> (the final key will be available under the environment variable <code>BITRISE_GPLAY_SERVICE_ACCOUNT_KEY_URL<code>). We’ll need this for one of our workflow steps later.
After adding your Android keystore file and service account key to the “Code Signing” tab, we’ll switch over to the “Env vars” tab to configure a few more things we’ll need in our deploy workflow.
Confirm or configure environment variables
Bitrise will rely on a few configuration details to correctly execute the build and upload steps in our workflow, captured in the form of environment variables. You can scope environment variables to specific workflows, or add environment variables that will be available to all workflows for your Bitrise app.
Navigate to the “Env vars” tab in the deploy workflow. If you recall, Bitrise will scan your project and attempt to automatically detect your project’s build configuration during the initial app configuration flow. If it was able to do this successfully, you’ll notice that Bitrise might have already populated some environment variables for you. If not, add the following env variables to the deploy workflow environment variables list:
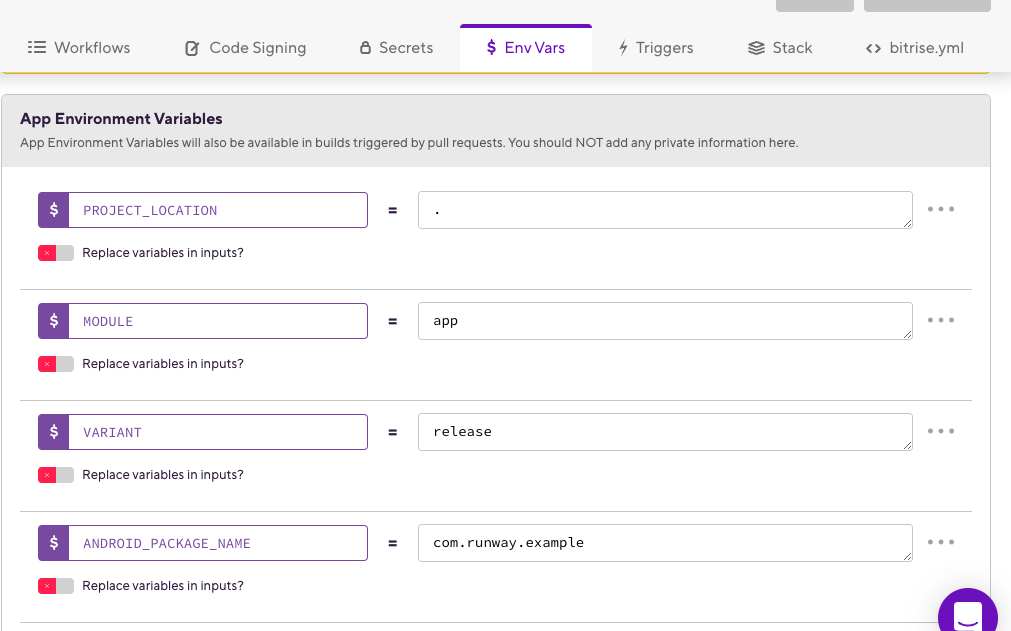
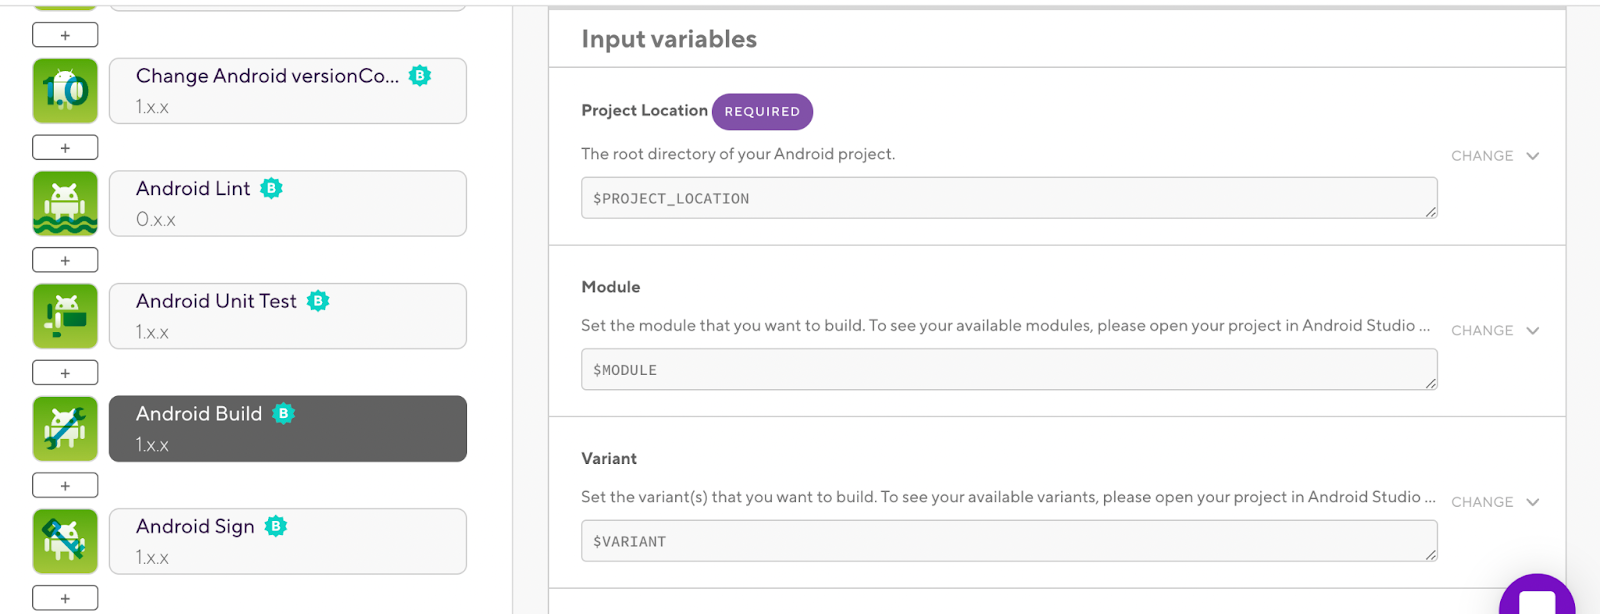
<code>PROJECT_LOCATION<code>: the root directory of your Android project.
<code>MODULE<code>: the module that you want to build.
<code>VARIANT<code>: the variant (or variants) that you want to build. You can set multiple variants by separating the variant names with a “\n”, for example “release\nstaging”
<code>ANDROID_PACKAGE_NAME<code>: the name of the package you want to build.
With these workflow environment variables set up, we can start adding and configuring the steps required for our deploy workflow to build and upload builds to the Google Play Console.
Configure existing steps and add additional steps
Switch back to the workflow editor, and select the deploy workflow from the dropdown. Let’s break down the extra steps that can be found in this workflow.
“Do anything with Script” step
Pretty much what it sounds like! Bitrise has added an empty scripting step to this workflow that you can use to execute any custom scripts in your project before the rest of the steps happen. We’re not going to use it for this tutorial, so you can scroll down to the bottom of the step and click “Delete Step: Do anything with Script step”.
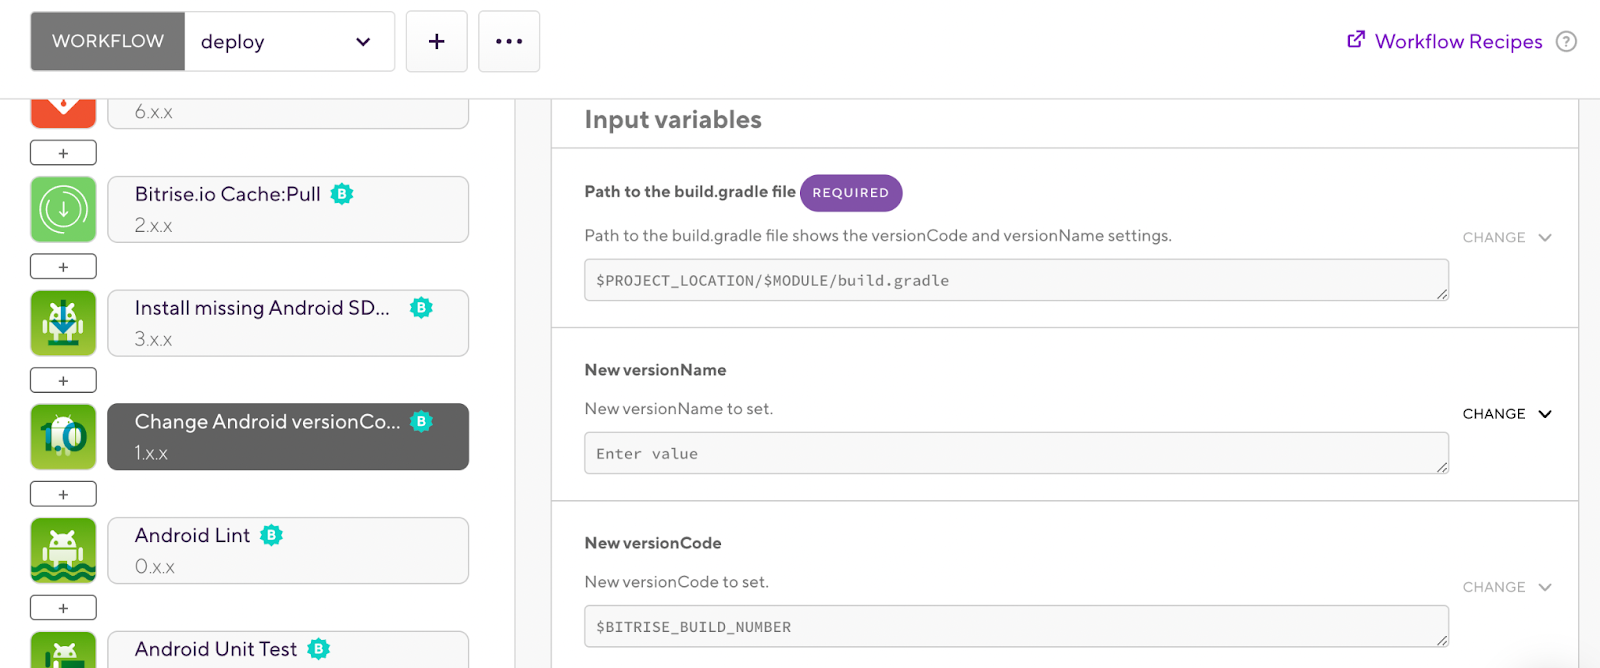
"Change Android versionCode and versionName" step
This step can set the <code>versionCode<code> and <code>versionName<code> fields in the Android project module’s <code>build.gradle<code> file. You’ll notice that only the Path to the build.gradle file input field is required, and Bitrise has already pre-populated the field with the value <code>$PROJECT_LOCATION/$MODULE/build.gradle.<code> This is why it was important to verify that the environment variables Bitrise populated in the “Env vars” tab match our project’s configuration. If the <code>build.gradle<code> path assumed by Bitrise is correct, you can leave it set to the default. Otherwise, enter the correct path to your module’s <code>build.gradle<code> file.
Next, you’ll notice three optional input fields: New versionName, New versionCode, and versionCode offset. The New versionCode field by default is set to the <code>BITRISE_BUILD_NUMBER<code> environment variable. This is the number associated with the run of the workflow in the context of the Bitrise app, and it will always increase sequentially starting from 1 (the first workflow run). Since it increments sequentially, it’s a great option for incrementing Android versionCodes in a simple way. We’ll leave it set to the <code>BITRISE_BUILD_NUMBER<code> env var, and move on to the next step.
The New versionName and versionCode Offset fields don’t have default values set – it’s not common for CI/CD workflows to modify the versionName, which is usually defined in the build.gradle and updated only once per release cycle. A version code offset would only be required under special circumstances. You can leave both of those fields empty for this tutorial.
"Android Build" step
This step will build our Android project using the module and variant we specified in the “Env vars” section. Scroll down to the Build type input variable for the step, and update it to “aab” if you want your final build to be a <code>.aab<code> file. The rest of the input variables can keep their default values.
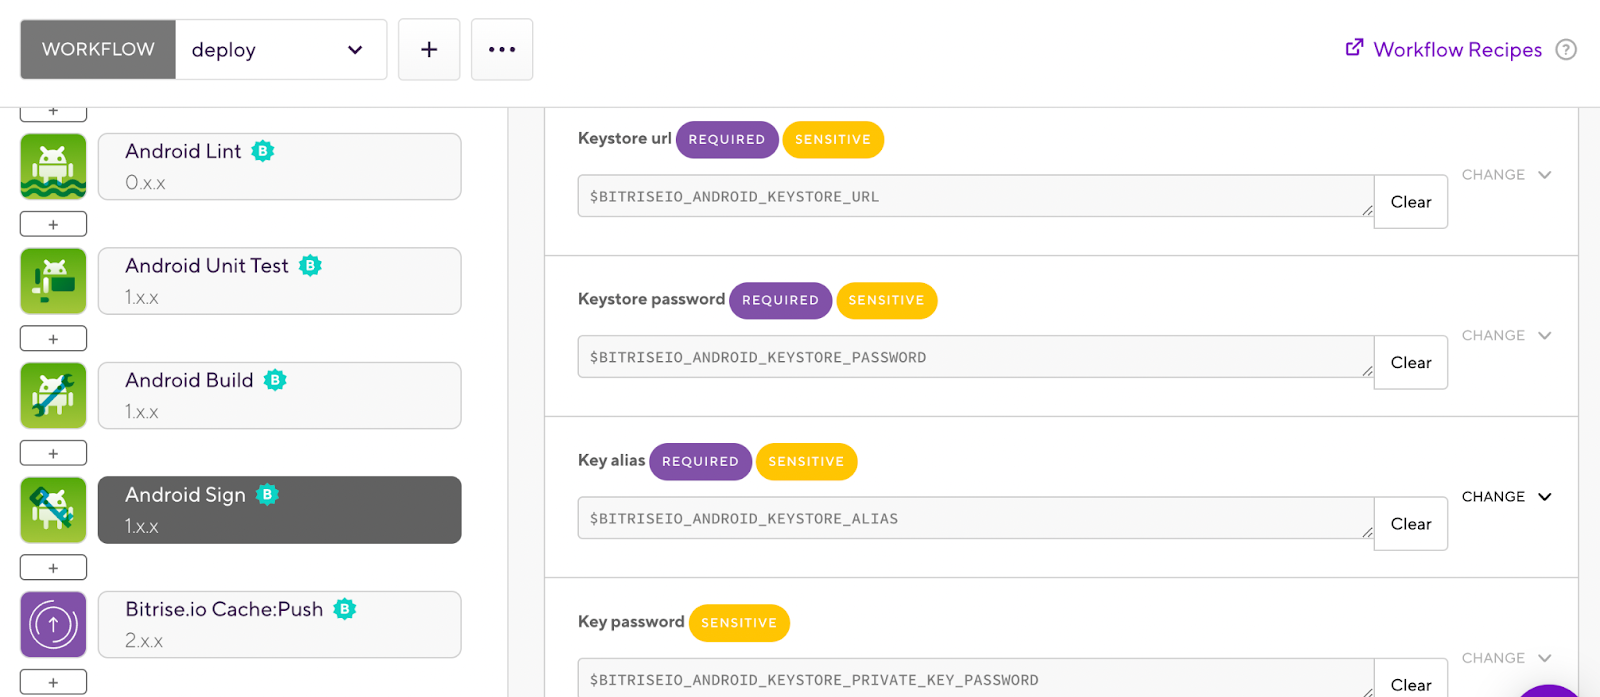
"Android Sign" step
This step will take the build generated by the Android Build step, and sign it with the keystore we uploaded in the “Code Signing” tab. All of the default environment variables used should already be the correct ones for accessing the keystore details we added earlier.
So we have a workflow that will build our Android project using the module and variant of our choosing, and will sign the resulting build using the keystore we uploaded. Now, we want to upload the signed build to the Google Play Console.
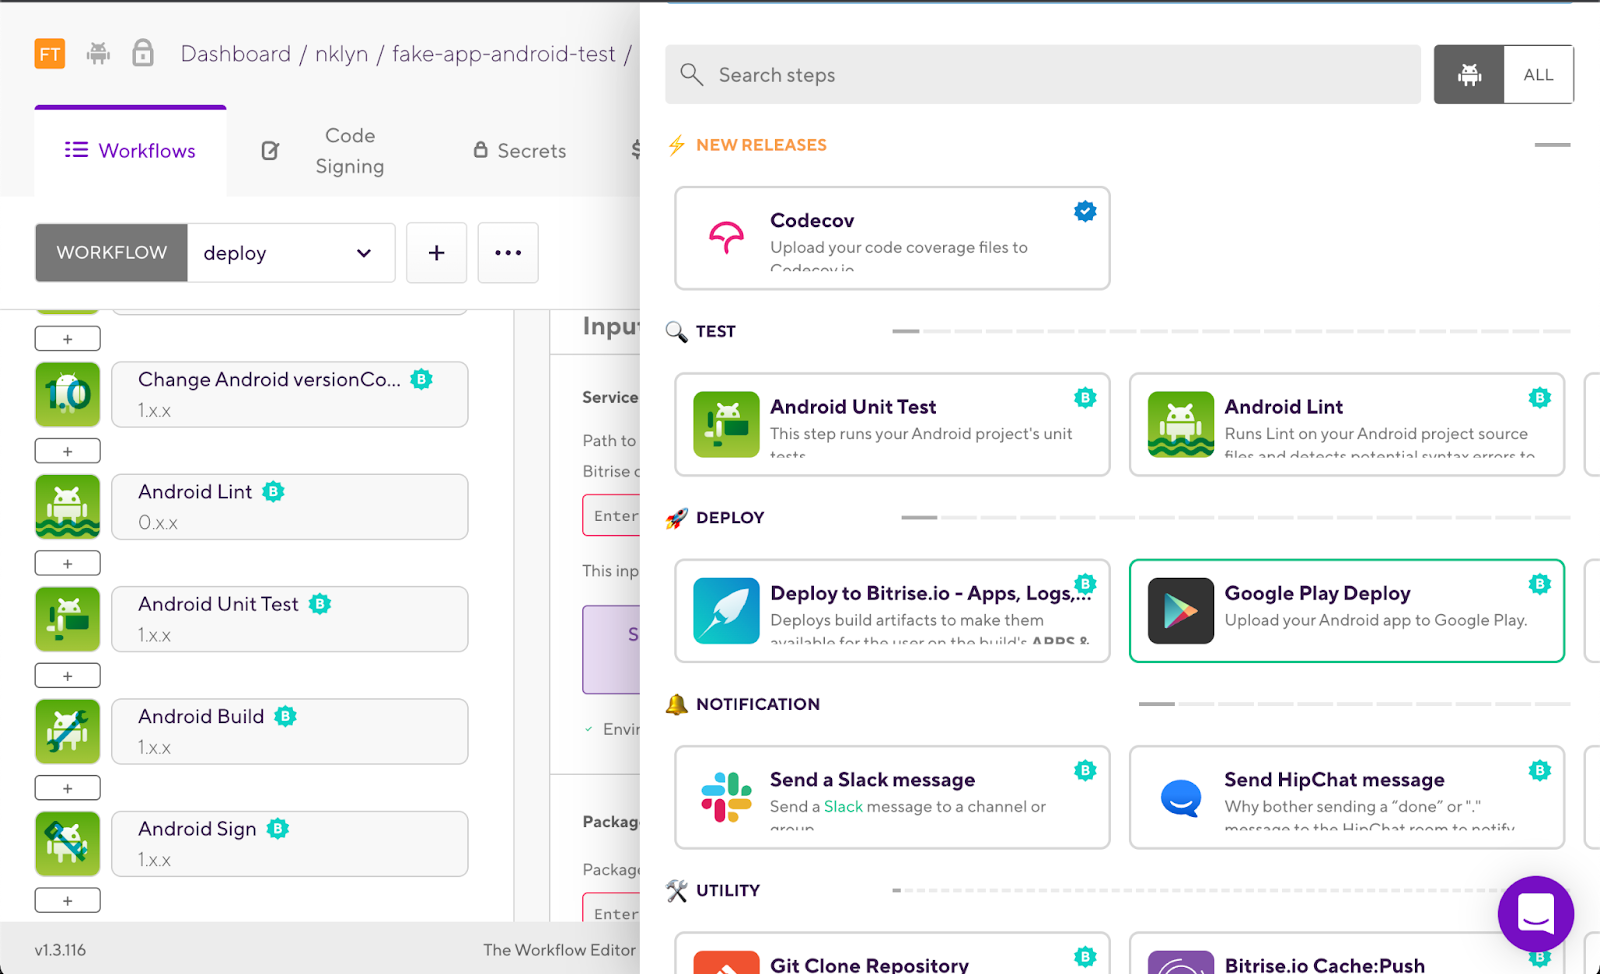
"Google Play Deploy" step
Click the + button below the Android Sign step on the left side of the workflow editor to open up the step marketplace. Search for the Google Play Deploy step, and select it.
Under the step’s Input variables, click “Select secret variable” under the Service Account JSON key file path input variable. Select the variable named <code>BITRISE_GPLAY_SERVICE_ACCOUNT_KEY_URL<code> – this is the same service account key JSON file that we uploaded to the “Code signing” tab earlier. Then, enter the <code>ANDROID_PACKAGE_NAME<code> environment variable under the Package name input variable.
The rest of the fields can keep their default values, but let’s look at one in particular: Track. The default value for the Track input variable is <code>internal<code> – the step will upload the signed build to the Play Console and assign it to the <code>internal<code> track. Any internal testers set up on the Google Play Console will automatically get access to the build as soon as it’s uploaded.
Now, let’s take a step back and look at the completed deploy workflow. It should have the following steps in this order:
- Activate SSH key
- Git Clone Repository
- Bitrise.io Cache:Pull
- Install missing Android SDK components
- Android Lint
- Android Unit Test
- Change Android versionCode and versionName
- Android Build
- Android Sign
- Google Play Deploy
- Bitrise.io Cache:Push
- Deploy to Bitrise.io: Apps, Logs, Artifacts
- Bitrise.io Cache: Push
Next, we’ll configure the triggers that will start the deploy workflow, and then we’ll give it a spin.
Configure workflow triggers
Navigate to the “Triggers” tab in the deploy workflow to view a list of triggers configured for your Bitrise app. Triggers are special events that cause a workflow to run against a specific branch. Some common triggers include pushing to a branch, opening a pull request against a branch, and creating a tag. Triggers are a great way to automate the kickoff event for builds.
Let’s add a push trigger on branches with the pattern <code>release-*<code> – meaning pushes to any branches that start with <code>release-<code> will trigger our workflow.

With this trigger set up, pushes to release branches will automatically trigger the deploy workflow, building the app and uploading the resulting signed build to the Google Play Console!
Kick off a build
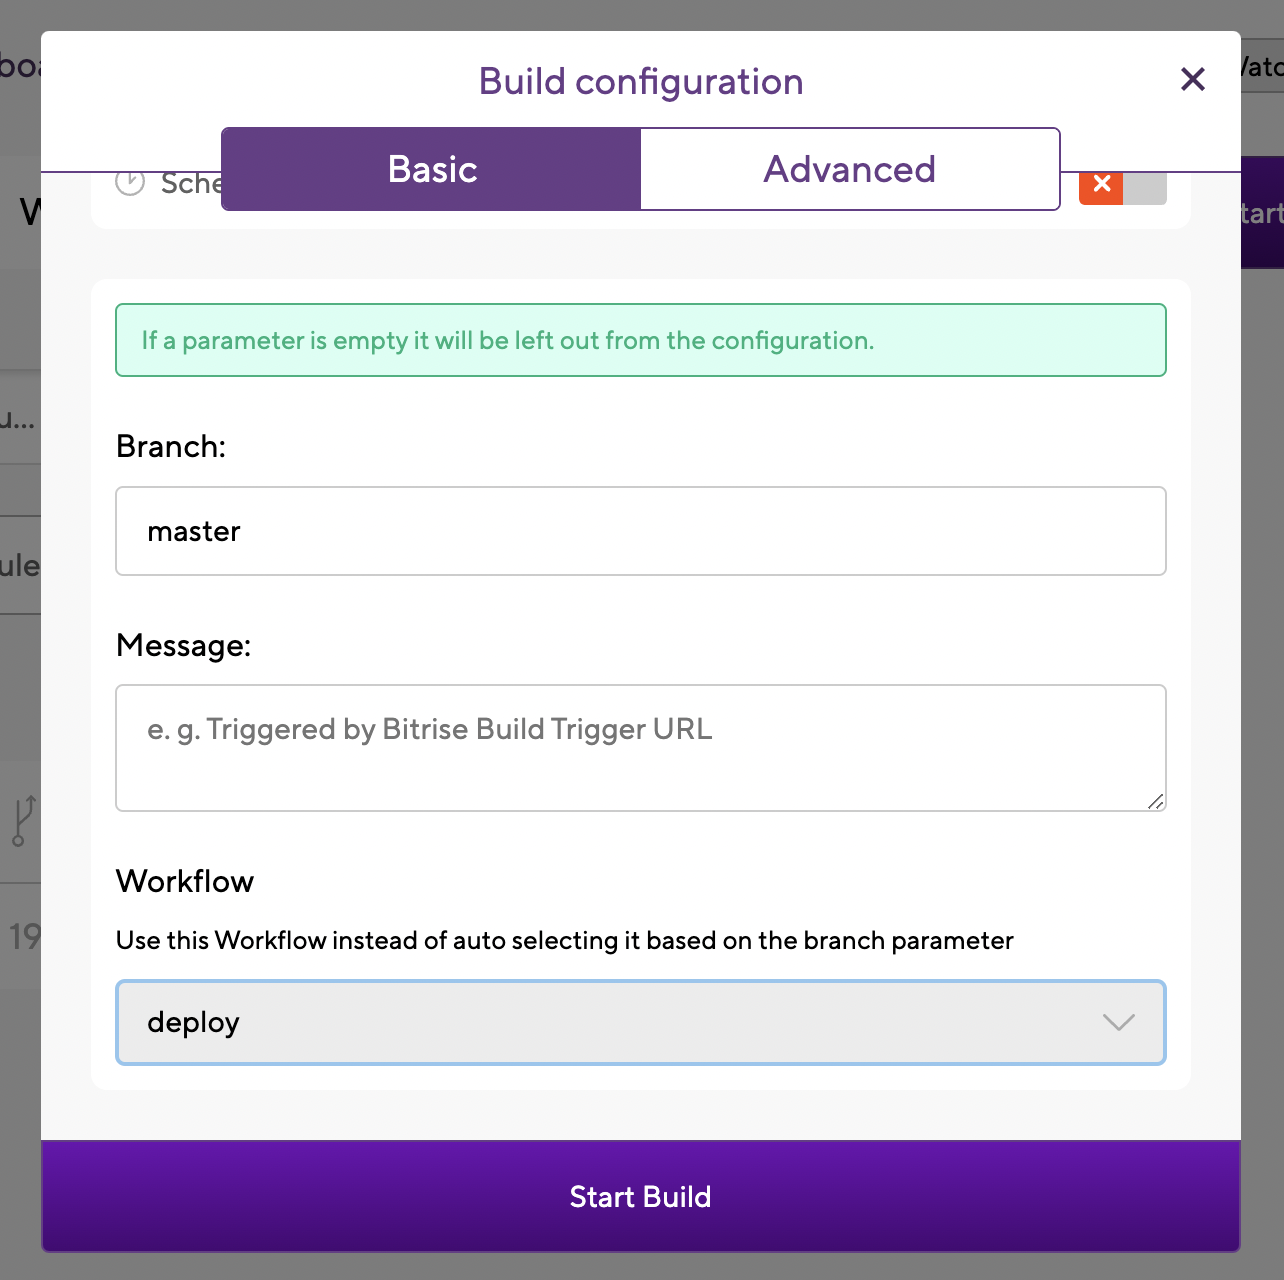
Triggers are great for automatically starting workflows in response to events happening on your version control system, but you can also manually start workflows right from the Bitrise UI. Let’s do this now to run our deploy workflow for the first time.
From the main app dashboard, click “Start/Schedule build”. Choose a branch for your workflow to be run on, and then select deploy as the workflow.
The deploy workflow will run through each step we defined above, and at the end of all of that a signed <code>.aab<code> will be uploaded to the Google Play Console and assigned to the internal track. We can also find any artifacts created as part of the workflow (including the signed and unsigned <code>.aab<code> files and universal apks) on the “Apps & Artifacts” tab in the workflow run’s build page. You can view the logs for the workflow run on the build page as well.

And that’s it! We’ve successfully set up a build & deploy workflow for an Android app entirely using Bitrise’s UI. Now, with this pipeline in place, anyone on your team is empowered to create and upload builds, removing a common bottleneck while also increasing reliability and consistency in the process. And you don’t have to stop there – in addition to all of the (open source!) Bitrise-maintained workflow steps available in the UI, there are plenty more steps created and maintained by the awesome community of mobile developers leveraging Bitrise to improve their own CI/CD pipelines.
Questions or issues? Get in touch!


